Cornell University: ECE 4960
Lab 4(a): Open Loop Control
Objective
The purpose of this lab is for you to change from manual to open loop control of the car. At the end of this lab, your car should be able to execute a pre-programmed series of moves, using the Artemis board and the motor driver communicating via i2c interface.
Parts Required
- 1 x SparkFun RedBoard Artemis Nano
- 1 x USB A-to-C cable
- 1 x Li-Ion 3.7V 400 or 500mAh battery
- 1 x Sparkfun Qwiic motor driver
- 1 x R/C stunt car and NiCad battery
- 1 x Qwiic connector
- 1 x Small screwdriver (Phillips or flathead)
- 1 x Wirecutter (you can also make do with a scissor)
Prelab
Check out the documentation and the datasheet for the Serially Controlled Motor Driver (SCMD). The hookup guide for the Qwiic motor driver can be found here.
Instructions
- Hookup the Artemis and the motor driver using a Qwiic connector.
- Go to File->Examples->Wire and open Example1_wire.
- Browse through the code to see how to use i2c commands.
- Run the code to find the address of your Serially Controlled Motor Driver (SCMD) and double check that it matches the one reported on Sparkfun.
- Take your car apart!
- Unscrew and remove the shell and bumpers from your car, remove the battery, and take out the control PCB.
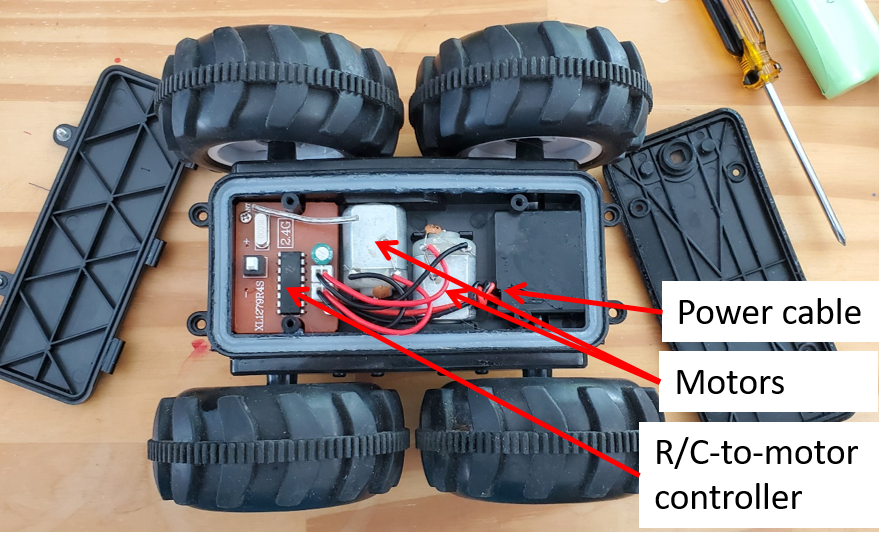
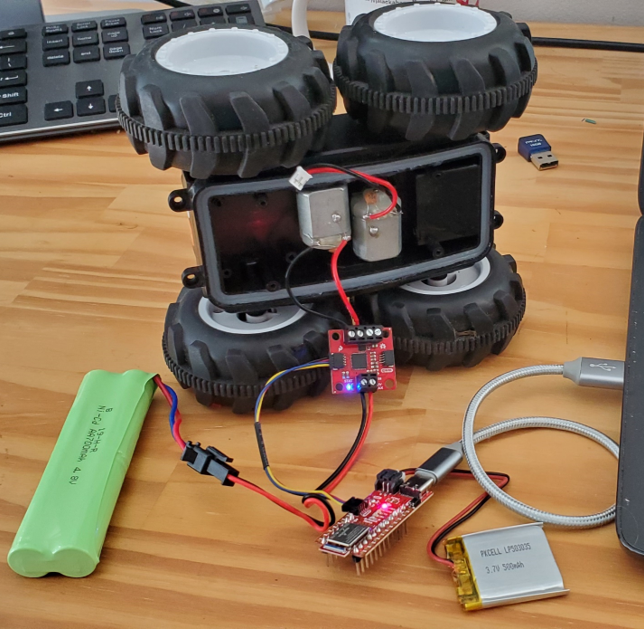
- Cut the power wires to the control PCB, and hook them up to the SCMD instead. Note that “VIN” on the SCMD marks the location of the positive terminal.
- Cut the motor wires and hook them up to your board instead. Be very careful not to twist them unneccesarily as they can break off from the motors which would require resoldering. If this happens please contact your teaching team asap.
- Using the Arduino library manager (Tools->Manage Libraries), install the SCMD (Serially Controlled Motor Driver) library.
- Check that you can control both your motors. It may be helpful to follow the example from “..\Arduino\libraries\Serial_Controlled_Motor_Driver\examples\MotorTest”, but note that this code will not work without modifications.
- Explore the lower limit for which each motor still turns.
- If your motors do not spin at the same rate, you will need to implement a calibration factor. To demonstrate that your robot can move in a fairly straight line, record a video of your robot following a straight line (e.g. a piece of tape) for at least 2m/6ft. The robot should start centered on the tape, and still partially overlap with the tape at the end. Note that the speed you’re driving may affect how susceptible the wheeels are to sticking.
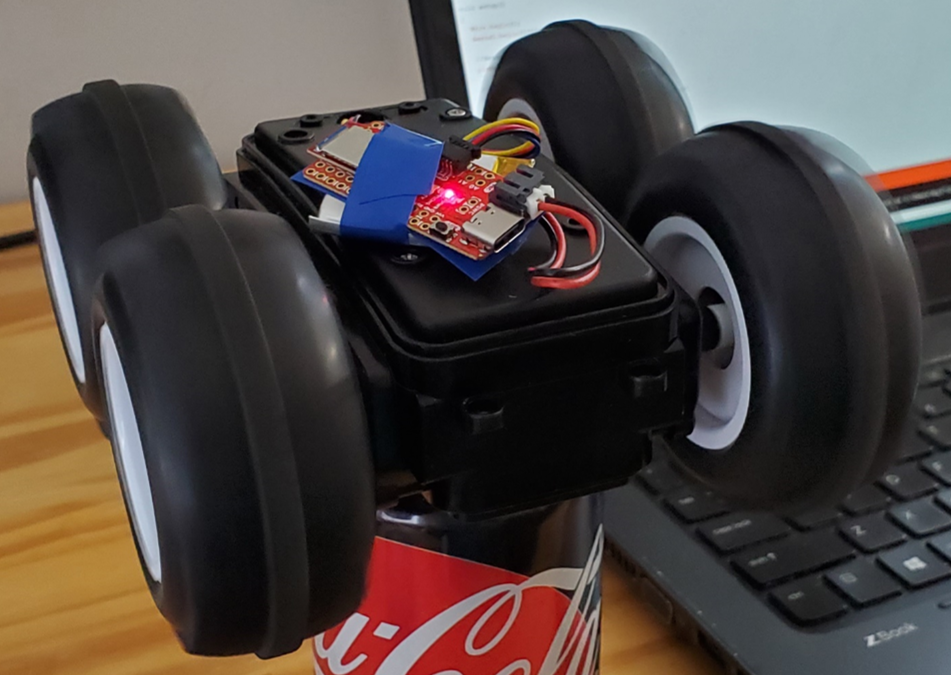
- Assemble your robot. If you cannot fit the new electronics inside the chassis, consider placing only the SCMD inside and route the Qwiic connector to the outside of chassis through the hole for the old start button.
- Demonstrate open loop, untethered control of your robot - add in some turns. For fun you could make it run only when it hears loud frequencies like here:
 .
.
Write-up
To demonstrate that you’ve successfully completed the lab, please upload a brief lab report (<600 words), with code snippets (not included in the word count), photos, and/or videos documenting that everything work and what you did to make it happen.
Lab 4(b): Open Loop Control
Instructions
Workflow Tips
- Each lab has a specific “work” folder and you can create a bookmark in Ubuntu’s file explorer by dragging the folder to the left pane.
- Once you start the Jupyter server, you may leave it running until you finish the entire lab exercise.
- Utilize the “Save the machine state” option when closing your VM. It is still recommended to restart your VM occasionally.
- Familiarize yourself with the bash commands. It is a powerful tool that can greatly increase your productivity. (Refer to the Tutorials and Helpful Sections section).
Prelab
We will be using Jupyter notebooks for this lab (and possibly for all future lab simulations). Please follow ths tutorial to familiarize yourself with Jupyter notebooks and the Jupyter lab server.
Setup the base code
Follow the instructions here to setup the lab4 base code in your VM. You will need to follow these steps only once per lab. The video here depicts a visual walkthrough of the setup procedure.
- Close all open terminal windows. (Make sure no terminals are currently open)
- Download and extract the lab4 base code in your VM.
- In your file explorer, navigate to the extracted directory “lab4 base code”. It should have three files within it: lab4.zip, bash_aliases and setup.sh. DO NOT edit or move these files.
- Right click in an empty space in the file explorer and select “Open in Terminal”.
- This will open a terminal to the directory lab4_base_code.
- In the terminal window, type in:
./setup.sh - A successful setup process should output something like this:
> Log output written to: /media/sf_vm_shared/lab4_base_code/output_lab4.log > Lab Work Directory: /home/artemis/catkin_ws/src/lab4/scripts/ Validating... Step 1/3: Extracting Files to: /home/artemis/catkin_ws/src/ Step 2/3: Setting up commands Step 3/3: Compiling Project Successfully compiled lab. NOTE: Make sure you close all terminals after this message.- If it wasn’t successful, you will notice an error message. If so, upload the log file (location shown in the first line of the output) in a post in Campuswire and we can help you with the issue.
- Close all open terminal windows. Make sure no terminals are currently open after this step.
Start the simulator
Each lab has a “lab-manager”. It is an interactive launcher for various tools/apps required for the lab.
- At the bottom of the lab-manager, a green bar shows the various tools available for the lab.
- Each tool has a letter assigned to it.
- Once you press the assigned letter, you can start the tool by pressing <s> on your keyboard.
- You can stop a running tool by pressing <k> after selecting the specific tool.
- To quit the lab-manager, press <CTRL/CMD + C> in the lab-manager terminal window.
- Please refrain from using the “close button” in the top right corner of the simulator window to close it.
The video here depicts the process of starting a new terminal, launching the lab3-manager, and starting/stopping the various tool(s).
- Start the lab4-manager: Open a terminal window and type in the command:
lab4-manager - To launch the simulator, press <a> on your keyboard followed by <s>.
- The simulator window should open up. The robot is depicted as a green polygon and the obstacles as black line segments.
Jupyter Lab
We will be using Jupyter notebooks to write our Python code.
Before you can open a Jupyter notebook, you need to start the Jupyter server.
If the Jupyter server is stopped, you will not be able to run/open/modify any Jupyter notebooks.
- Open a terminal and change the directory to the lab4 work folder:
cd /home/artemis/catkin_ws/src/lab4/scripts - Start the Jupyter server in your VM. Open a terminal window and type in the command:
jupyter lab- The Jupyter server can only access notebooks from the directory it was started.
- So it is a good idea to start it from within the current lab’s work folder.
- The Jupyter lab web application should automatically open as a tab in your default web browser. If not, copy and paste the link from the terminal in your web browser.
- Open the notebook “lab4.ipynb” from the file browser pane in the left.
- Make sure the kernel is set to “Python 3”.
- This is shown in the top right corner of the notebook.
- The notebook should walk you through the exercise.
- SAVE your notebook after making changes, before closing the notebook or stopping the jupyter server.
- Once you have saved your work, you may stop the Jupyter server by pressing <CTRL+C> on your keyboard, in the terminal that is runnning the server.
Write-up
Please upload a brief lab report (<300 words) describing the logic behind your open loop controller for the virtual robot to execute the rectangular(ish) loop, along with code snippets (not included in the word count), photos, and/or videos documenting that everything works and what you did to make it happen. Please add this write-up to the page you generated for Lab 4(a).