Cornell University: ECE 4960
Lab 5(a): Obstacle Avoidance
Objective
The purpose of this lab is to enable your robot to perform obstacle avoidance. To do this, we first need to equip the robot with distance sensors - the further the robot can see and the more it can trust a sensor reading, the faster it is able to drive. Once you have your sensors working, you will mount them on your robot and attempt fast motion around your room without crashing into obstacles. You will use the VM simulator to implement similar behavior.
Parts Required
- 1 x SparkFun RedBoard Artemis Nano
- 1 x USB A-to-C cable
- 1 x 4m ToF sensor
- 1 x 20cm proximity sensor
- 1 x Li-Ion 3.7V 400 or 500mAh battery
- 1 x Sparkfun Qwiic motor driver
- 1 x R/C stunt car and NiCad battery
- 1 x Qwiic connector
- 1 x Gray target
- 1 x Ruler or graph paper
- 1 x Double sided tape
- 1 x Small screwdriver (Phillips or flathead)
- 1 x Wirecutter (you can also make do with a scissor)
Prelab
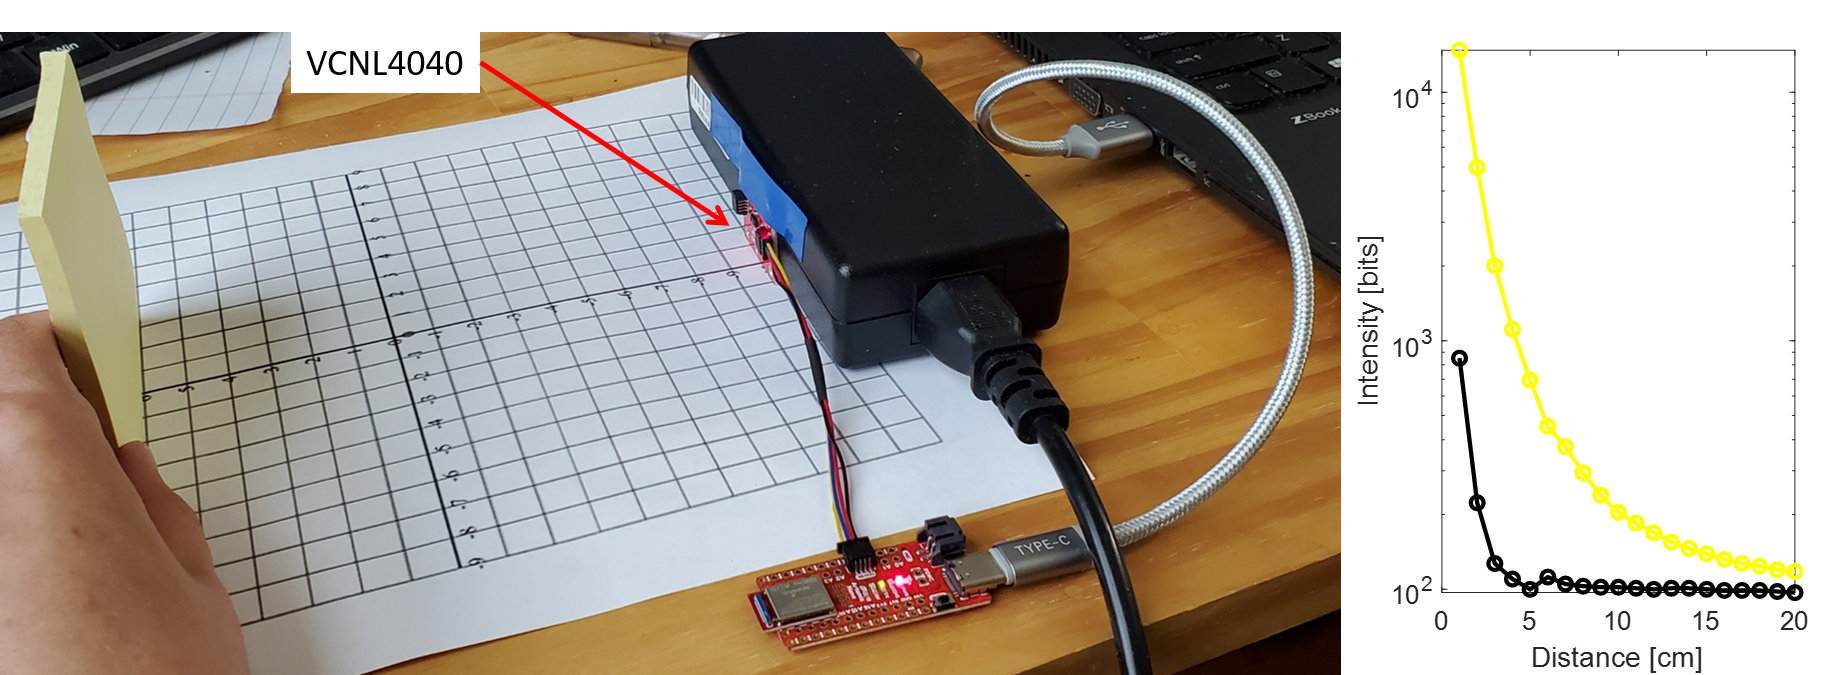
The proximity breakout board is based on a VCNL4040 sensor. Check out the datasheet and the Sparkfun repository. Note the sensor I2C address.
The Time-of-Flight (ToF) breakout board is based on the VL53L1X sensor. Please read the manual, and check out the datasheet before beginning this lab. Note the sensor I2C address.
Unfortunately, the address of each sensor is hardwired on the board, and can only be changed with access to constant power or a soldering iron. Since we have neither, we will have to depend on one of each sensor. Given their range and angular sensitivity, think about where you will place them on your robot to best detect obstacles. Discuss scenarios where your robot will miss obstacles.
Many distance sensors are based on infrared trasmission. Discuss a couple, highlight the differences in their fuctionality and the pros/cons of each. How would/will you use them on your robot?
Lab Procedure
Proximity Sensor
- Using the Arduino library manager, install the SparkFun VCNL4040 Proximity Sensor Library.
- Hook up the VCNL4040 to the Artemis board using a QWIIC connector.
- Similar to the last lab, scan the I2C channel to find the sensor. Does the address match what you expected? If not, explain why.
- Test your proximity sensor using the “..\Arduino\libraries\SparkFun_VCNL4040_Proximity_Sensor_Library\examples\Example4_AllReadings”. Map the sensor readings to the actual distance. Try objects with different color and texture, and in different lighting conditions. Explain if/why the sensor is sensitive to the particular parameter. Also, note how frequent measurements are updated and how long it takes to read them.
Time of Flight Sensor
- Using the Arduino library manager, install the SparkFun VL53L1X 4m laser distance sensor library.
- Connect the VL53L1X breakout board to the Artemis board using a QWIIC connector.
- Similar to the last lab, scan the I2C channel to find the sensor. Does the address match what you expected? If not, explain why.
- Test your ToF sensor using the “..\Arduino\libraries\SparkFun_VL53L1X_4m_Laser_Distance_Sensor\examples\Example1_ReadDistance” example and the graph paper (or a ruler).
- Your sensor may need calibration. If so, run the “..\Arduino\libraries\SparkFun_VL53L1X_4m_Laser_Distance_Sensor\examples\Example7_Calibration” example, using the grey target in your kit. Follow the instructions in the file.
-
The ToF sensor has a timing budget that affects sensor accuracy, range, measurement frequency, and power consumption. For more detail please check Section 2.5.2 in the manual. Below are some relevant functions. Try out some settings, and discuss your choice of settings related to the anticipated speed of your robot.
<pre>
.setIntermeasurementPeriod();
.setTimingBudgetInMs();
</pre> -
The ToF sensor further has three modes, that optimize the ranging performance given the maximum expected range. Document which mode you expect to use for your robot, given its speed and acceleration profile.
<pre>
.setDistanceModeShort();  //1.3m
.setDistanceModeMedium(); //3m
.setDistanceModeLong();   //4m, Default
</pre> -
Not all measurements will be accurate, especially when the robot is moving fast. To deal with this, the ToF sensor has two parameters, “signal and sigma”, that tell you whether the measurement you read is valid. These features are detailed in Sec. 2.5.4 in the manual. To see how often failure modes occur, run the “..\Arduino\libraries\SparkFun_VL53L1X_4m_Laser_Distance_Sensor\examples\Example3_StatusAndRate” example. Try rapidly changing the distance from the sensor to an object and describe what happens. Consider how this will impact your motion implementation in future labs.
- Finally, document your ToF sensor range, accuracy, repeatability, and ranging time. Check and discuss whether the sensor is sensitive to different colors and textures.

Obstacle Avoidance
- Make your robot continuously drive around the room without hitting obstacles.
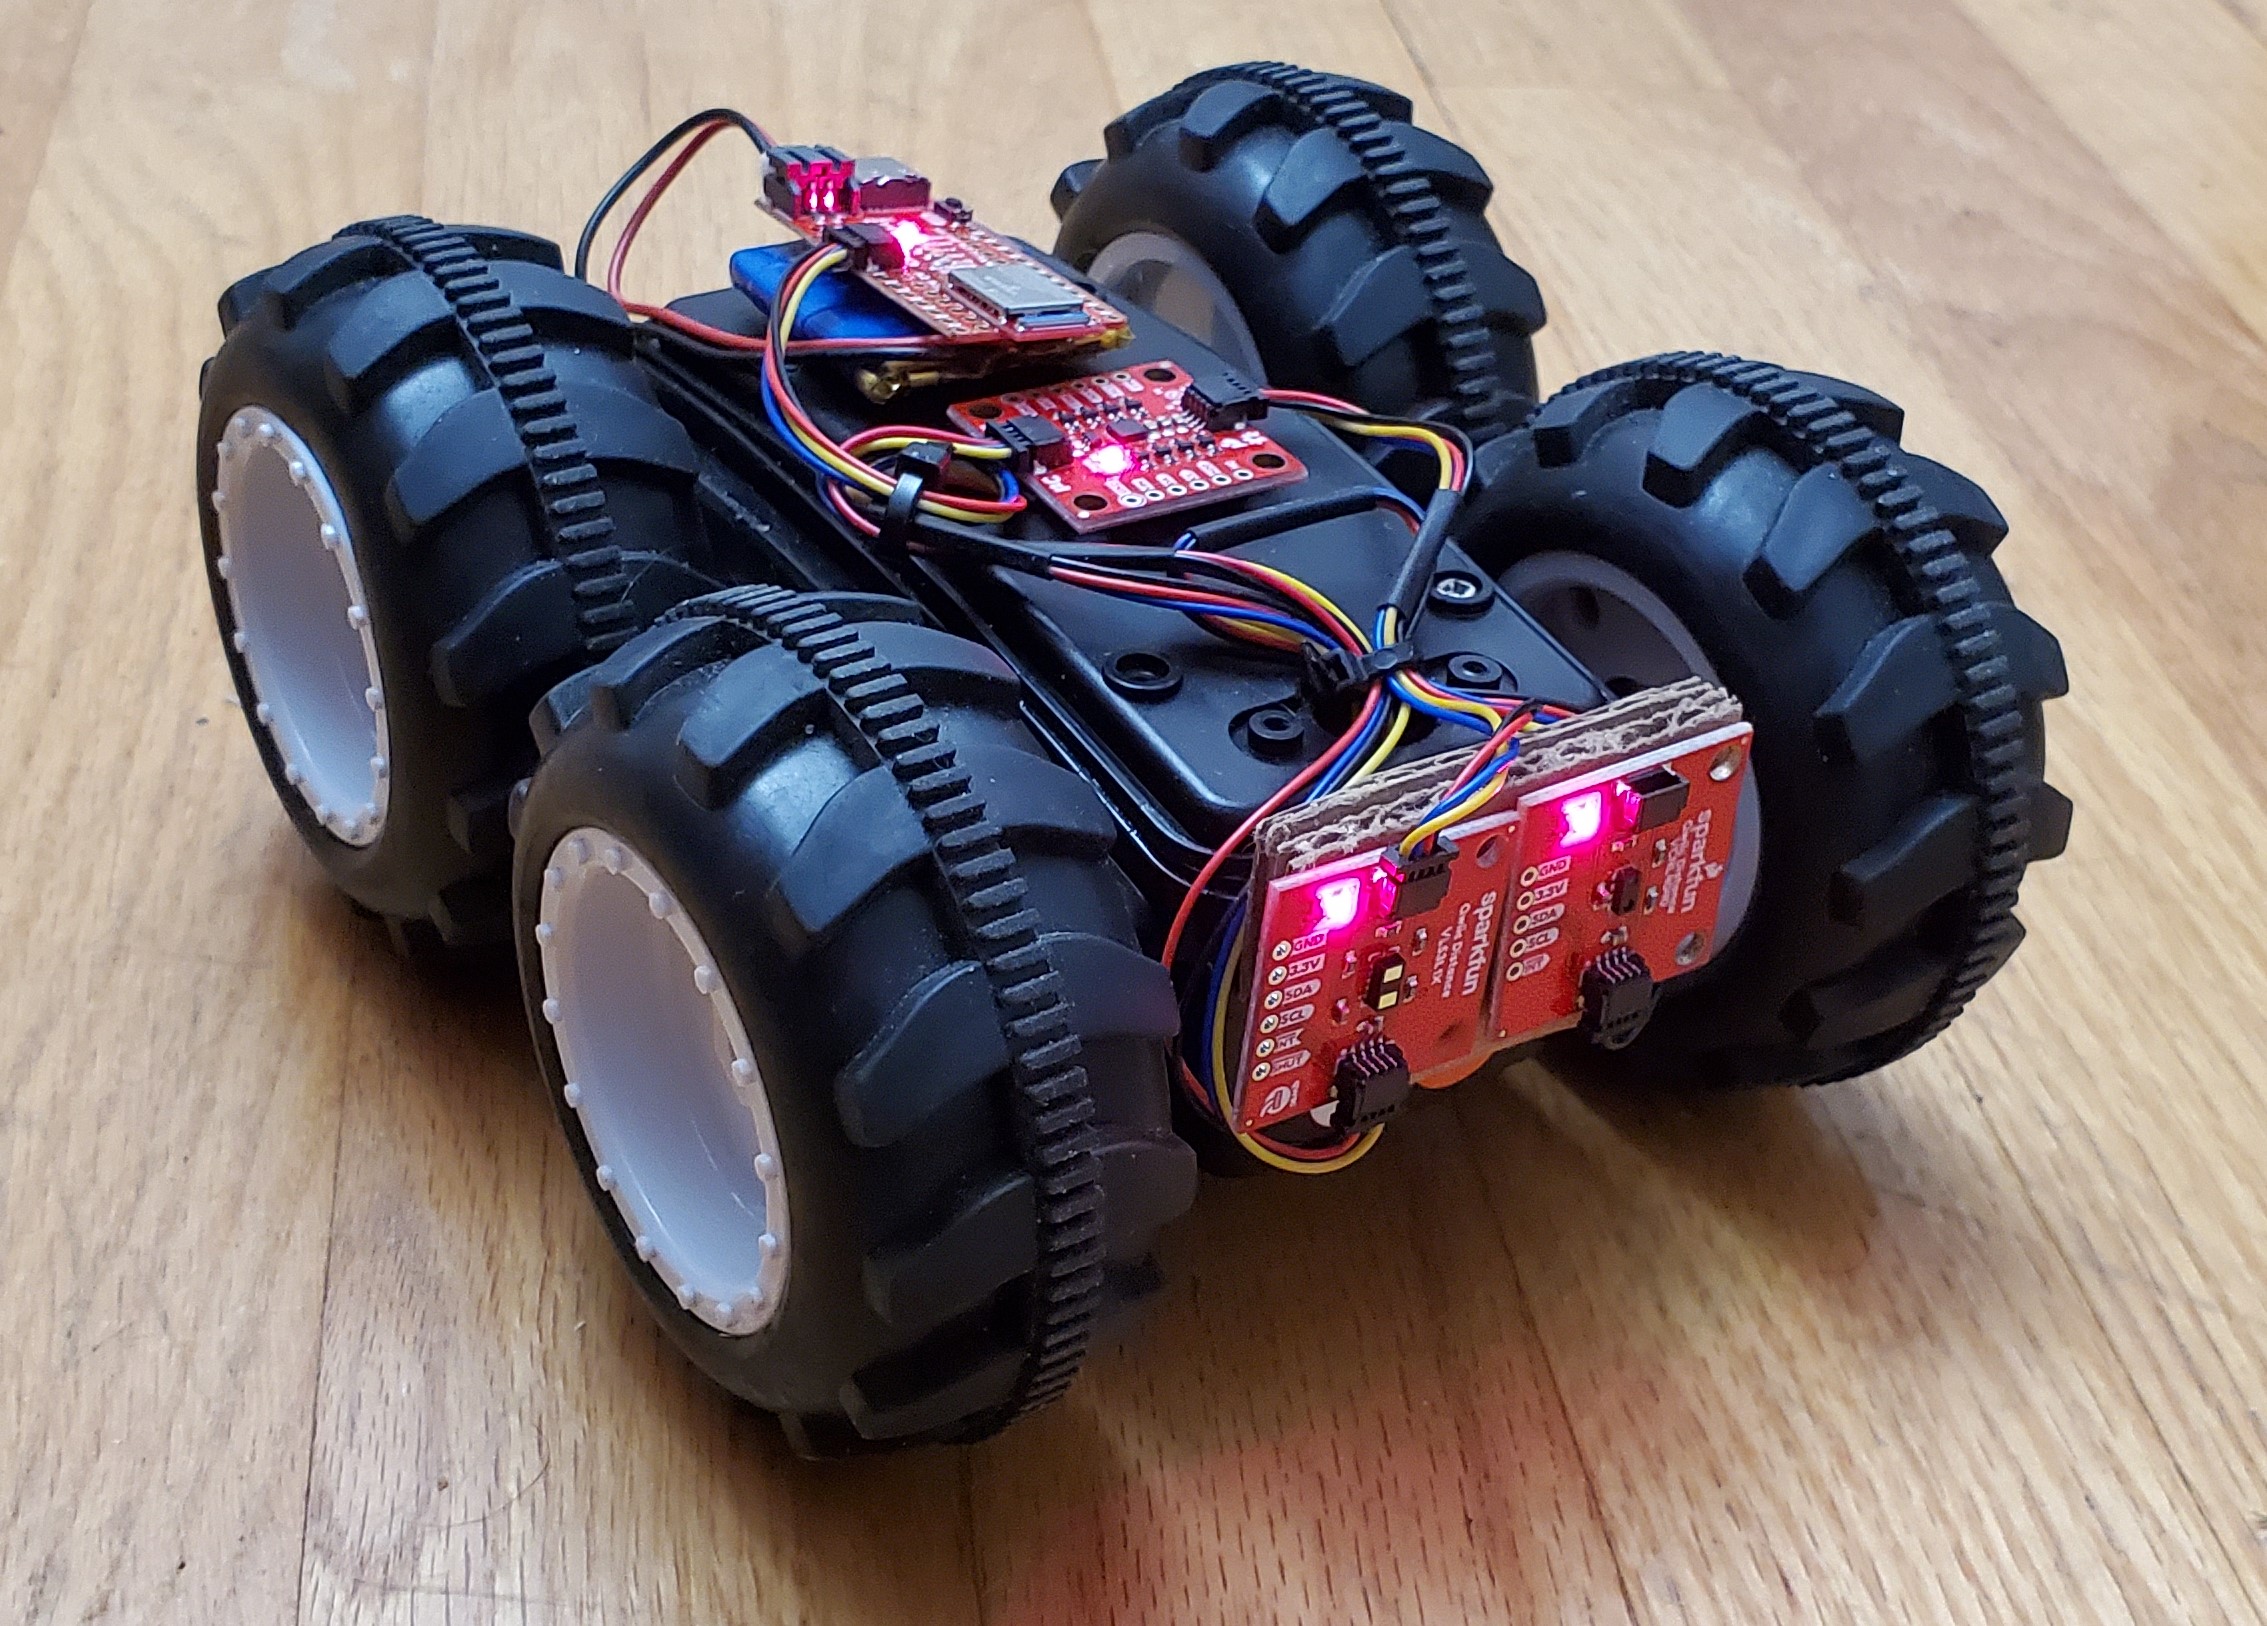
- Mount sensors, Li-Ion battery, and processor firmly to your car using the double sided tape from the kit.
- Note that you might have to open up the chassis to bring out an extra QWIIC connector to daisy chain it with the motor driver if you have not already done this.
- In high speed systems, you need to avoid any code that ties up your processer when it could be doing other things. As an example, avoid using functions like .VL53L1_WaitMeasurementDataReady() that halts the processor, and instead check whether data is ready .VL53L1_GetMeasurementDataReady().
- To help you debug, start the robot on a stationary raised platform to make sure everything works. When you are ready, transition to slow driving first. Remember to record everything so that you can document your lab even if you run out of time.
- Ramp up the speed and try to make the robot go as fast as possible, while still being able to respond to obstacles. Feel free to avoid the scenarios that you identified earlier as not feasible given your sensor arrangement.
- To document how fast your robot can drive while avoiding obstacles, record a video of it driving along a known-length strip of tape towards a wall, (hopefully) stopping or turning before it hits the wall.
- Document your experience and points of future improvement, feel free to upload bloopers!
Write-up
To demonstrate that you’ve successfully completed the lab, please upload a brief lab report (<1.000 words), with code snippets (not included in the word count), photos, and/or videos documenting that everything worked and what you did to make it happen.
Lab 5(b): Obstacle Avoidance on your virtual robot
Instructions
Workflow Tips
- Once you start the Jupyter server, you may leave it running until you finish the entire lab exercise.
- If the Jupyter server is stopped, you will not be able to run/open/modify any Jupyter notebooks.
- Utilize the “Save the machine state” option when closing your VM. It is still recommended to restart your VM occasionally.
- Close the simulator from the lab-manager terminal window. Do not try to quit the simulator using any other method.
Setup the base code
Follow the instructions here to setup the lab5 base code in your VM. You will need to follow these steps only once per lab.
- Close all open terminal windows. (Make sure no terminals are currently open)
- Download and extract the lab5 base code in your VM.
- In your file explorer, navigate into the extracted directory “lab5 base code”. It should have three files within it: lab5.zip, bash_aliases and setup.sh. DO NOT edit or move these files.
- Right click in an empty space in the file explorer and select “Open in Terminal”.
- This will open a terminal to the directory lab5_base_code.
- In the terminal window, type in:
./setup.sh- If it wasn’t successful, you will notice an error message. If so upload the log file (location shown in the first line of the output) in a post in campuswire and we can help you with the issue.
- Close all open terminal windows. Make sure no terminals are currently open after this step.
Start the simulator
Start the simulator from the lab5-manager:
lab5-manager
Jupyter Lab
We will be using Jupyter notebooks to write our python code.
Before you can open a Jupyter notebook, you need to start the Jupyter server.
If the Jupyter server is stopped, you will not be able to run/open/modify any Jupyter notebooks.
- Open a terminal and change the directory to the lab5 work folder:
cd /home/artemis/catkin_ws/src/lab5/scripts - Start the Jupyter server in your VM. Open a terminal window and type in the command:
Jupyter lab- The Jupyter server can only access notebooks from the directory it was started. So it is a good idea to start it from within the current lab’s work folder.
-
The Jupyter lab web application should automatically open as a tab in your default web browser. If not, copy and paste the link from the terminal in your web browser.
- Open the notebook “lab5.ipynb” from the file browser pane in the left.
- Make sure the kernel is set to “Python 3”.
- This is shown in the top right corner of the notebook.
- The notebook should walk you through the exercise.
- SAVE your notebook after making changes, before closing the notebook or stopping the Jupyter server.
- Once you have saved your work, you may stop the Jupyter server if required by pressing <CTRL+C> on your keyboard, in the terminal that is running the server.
Tips
You may use the following questions to guide you through the lab exercise and write your report:
- What is the duration of a velocity command?
- By how much should the virtual robot turn when it is close to an obstacle?
- At what linear speed should the virtual robot move to minimize/prevent collisions? Can you make it go faster?
- How close can the virtual robot get to an obstacle without colliding?
- Does your obstacle avoidance code always work? If not, what can you do to minimize crashes or (maybe) prevent them completely?
Write-up
To demonstrate that you’ve successfully completed the lab, please upload a brief lab report (<300 words), with code snippets (not included in the word count), photos, and videos documenting that everything worked and what you did to make it happen. Please add this write-up to the page you generated for Lab 5(a).