Cornell University: ECE 4960
Lab 9: Localization on the real robot
Objective
In this lab you will localize in the map that you setup during lab 7 using your actual robot. The point of the lab is to appreciate the difference from simulation to practice. We will further introduce you to a fast version of the off-board localization code.
Parts Required
1 x Fully assembled robot, with Artemis, batteries, TOF sensor, and IMU. A tape measure will also be very helpful!
Prelab
Localization Module:
We provide you with a fully-functional and optimized Bayes filter implementation that works on the virtual robot. You will make code changes so that the module can work with your real robot. Note the time it takes to run the update and prediction step. You will find that we took several measures to enable fast computation in practice:
- Pre-caching ray casting values
- Numpy processing
- Skipping grid cells with low probabilities in the prediction step
- Utilizing fixed size numpy arrays instead of variable-length lists
- Minimizing the use of interim/temporary variables
World Setup
Setup the world and use the map definitions from Lab 7(b). The Localization module performs ray casting on the map provided. Hence, any deviations between the real world and the map will lead to incorrect true measurement values, and will thus affect the efficacy of the Bayes filter.
Since there is no automated method to get the real robot’s ground truth pose, you will need to identify certain known poses using a ruler (and may be a protractor). Mark the origin of your map i.e (0,0,0) in the physical world using the provided tape. Then, mark a couple of random poses in the world and find their ground truth poses. You can drive your robot to these marked poses and compare the ground truth pose with the estimated pose (most probable pose based on your posterior belief). Also, it’s a good idea to mark the obstacles in the world in case you need to dismantle the setup due to space constraints (or because your roommate is tired of tripping over your stuff).
Grid Localization
Coordinate Frames and Transformation Matrix
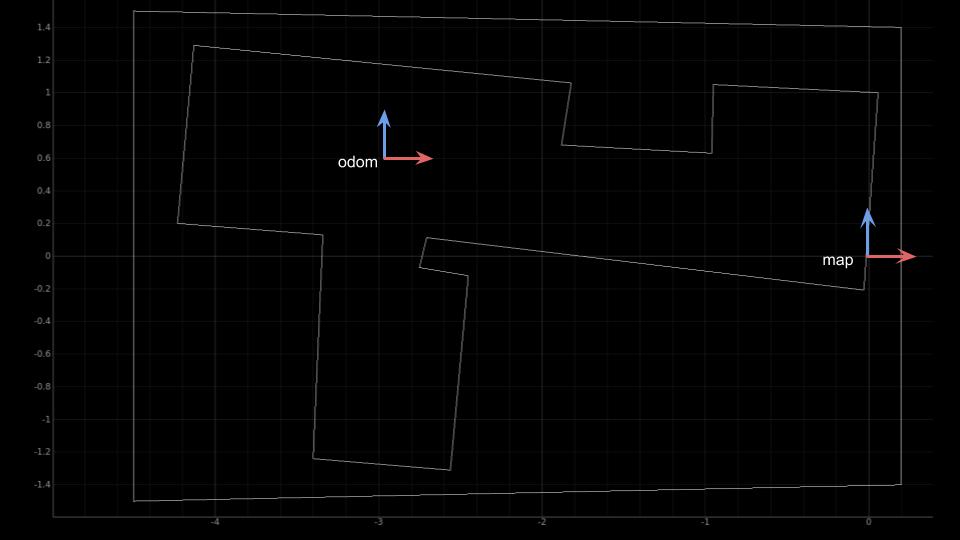
The reference of the world (0,0,0) is often referred to as the map frame. The starting position of the robot in the world is referred to as the odom frame, which serves as the odometry’s frame of reference. You will need to write a function that transforms the odometry pose from the odom frame into the map frame. To keep things simple, you can choose the starting location(s) for the robot such that their axes are always aligned with that of the map frame, as shown in the figure below. Thus the transformation matrix consists of only a 2D translational component. The red and blue arrows indicate the x and y axes of a frame, respectively.
Setup the base code
The base code consists of the following:
- robot_interface.py: Provides a fully-functional Localization module that works on the virtual robot.
- lab9_sim.ipynb: A Jupyter notebook that demonstrates the Bayes filter implementation on the virtual robot.
- lab9_doc.ipynb: A Jupyter notebook that provides you with the documentation for each class.
- lab9_real.ipynb: A Jupyter notebook that provides you with a skeleton code for the RealRobot class and the Bayes filter.
Download the lab9 base code and follow the setup instructions as per the previous labs. Start the Jupyter server in your VM from the work directory:
cd /home/artemis/catkin_ws/src/lab9/scripts
Lab Procedure
- Using a uniform prior on the pose, run (only) the update step on the measurement data to localize
- Visualize your results
- Try several poses (locations and orientations) in your map, including some with unique characteristics and some that are harder to distinguish.
- Discuss your results
- Try a sequence of localization - motion - localization and include the odometry data into the prediction step
- Discuss what you find: does this improve your localization estimate, how does this affect the computation time, etc.?
- Note your biggest source of error.
Tips
- You will need to think about how your code will alternate between moving the robot and running an iteration of the Bayes filter. Here are two possible ways to do that:
- If you choose to always start your robot from a specific known pose and run a set of motion commands, you can store these commands in your code. Below is a sample code based on the definition of the member function set_vel() of class RealRobot. The control commands when executed will make your robot follow the (more or less) the same trajectory and hence may help you to debug. The robot motion is pretty noisy and so the repeatability of your trajectory may depend on a number of factors such as surface properties, battery charge, speed, etc.
# Each row is a control input of the form (w1, v, w2) where v is the linear velocity, and w1 and w2 are angular velocities. cmd_vels = [[60, 50, 80], [90, 40, 100], [65, 33, 45], [30, 50, 80], [90, 50, 100] ] # The sleep times may be different based on your specific command velocities for cmd_vel in cmd_vels: robot.set_vel(v=0,w=cmd_vel[0]) time.sleep(1) # sleep for 1 sec robot.set_vel(v=cmd_vel[1], w=0) time.sleep(1) # sleep for 1 sec robot.set_vel(v=0, w=cmd_vel[2]) time.sleep(1) # sleep for 1 sec robot.set_vel(v=0,w=0) # Stop the robot - You may choose to manually move the robot using a separate tele-operation python script that provides a minimal GUI to control your real robot. Take a look at the documentation for class RobotControlWindow in the file “scripts/teleop_real_robot.py” and make changes to the functions publish_linear_vel() and publish_angular_vel() accordingly. You can then add the line
raw_input()at the end of an iteration of your Bayes filter algorithm (in the Jupyter notebook). The program will wait until you press the <Enter> key on your keyboard. As it waits for your input, you can use the tele-operation tool to move your robot.
- If you choose to always start your robot from a specific known pose and run a set of motion commands, you can store these commands in your code. Below is a sample code based on the definition of the member function set_vel() of class RealRobot. The control commands when executed will make your robot follow the (more or less) the same trajectory and hence may help you to debug. The robot motion is pretty noisy and so the repeatability of your trajectory may depend on a number of factors such as surface properties, battery charge, speed, etc.
- If you get poor localization results or encounter issues in your code, be sure to checkout the FAQ section.
Write-up
To demonstrate that you’ve successfully completed the lab, please upload a brief lab report (<1.000 words), with code (not included in the word count), photos, and videos documenting that everything worked and what you did to make it happen. Include the most probable state after each iteration of the Bayes filter along with its probability, compare it with the ground truth pose, and write down your inference.